The Adventure of Being a Little Boy is All about Appreciating the Simple Joys

Now that CHA is passed, I wanted to share some of my The Girls’ Paperie work I made for the show.

Journaling Reads:
One of the greatest things about having a little boy is seeing the joy that spreads over his face at the simplest things. I made this fabric ball in about five minutes and Nathaniel has gotten hours and hours of joy out of it. What more can I ask for in life?

All products are from The Girls’ Paperie Jubilee or Mix and Match lines.

Details:

No more caged birds it is time to be free

I was saving this CHA layout for after the show but since Margie shared this one on her blog, I am assuming it’s ok to share. This is one of The Girls’ Paperie work I made for the show.

Journaling Reads:
This year, more than any other, I am ready to embrace my word. I am ready to let go of my past. My ideas of who I can be and who I am and embrace a free and open future. Ready to be anything I choose. Anything I wish. Ready to fly free. 2011.

All products are from The Girls’ Paperie Vintage Whimsy or Mix and Match lines.

Details:

Published

I rarely ever submit to anything. I am too saddened by rejection and it’s often so much work. Especially to submit to magazines. I also always journal on my layouts and my handwriting is not beautiful or often legible. Which does not make me a good candidate. So it’s very rare to see any of my pages in a magazine.

However, I had the amazing honor of being published in the November/December 2010 issue of Swedish Scrapbooking m. m. magazine. They picked up a few of my layouts and a minibook.

This is a CHA Summer layout I made for The Girls’ Paperie

mine are the two on the right, more The Girls’ Paperie.

the mini i made with Maya Road goodies.

And then they did a feature article about my layout a day in may adventure.


Even though I cannot understand a word of it, I was so incredibly delighted to see my work in print. I am deeply thankful to scrapbooking m.m. for making me so so happy.

Thank you for letting me share my joy.

Holiday Project – Handmade Tags – Punched Ornaments

I made this tag for technique week at A Million Memories.

For my technique, I did something simple but fun.

1. I inked my office tag with Shabby Shutters and Tumbled Glass distress inks.
2. I used two of my Martha Stewart circular punches and the Girls’ Paperie Tinsel & Twig Festive Brocade paper to create some three-dimensional ornaments.
3. I then hung them on my tag with twine.
4. I took a few word stickers from the Girls’ Paperie Tinsel & Twig sticker sheet and stitched them down.
5. Then I stitched around my tag twice.
That’s it!!

I made a movie to show you how to make the ornaments:

And here’s one more look.

Holiday Project – Handmade Tags – Crooked Tree

I made this tag as part of a little something at A Million Memories.

I wanted to make a quick little tag that I could use on my presents this year. This tag was super-quick to make:

1. I took a plain manila tag from an office supply store.
2. I inked the background using several shades of green distress ink.
3. Using my edge punch, I punched out several strips from my The Girls’ Paperie Tinsel & Twig Snowfall paper in different sizes.
4. I layered the paper so that it looked like a tree and glued it all down.
5. I took the top of one of my The Girls’ Paperie Tinsel & Twig crape paper snowflakes and cut down the crepe paper a bit to make the top of my tree.
6. I used the rest of the crepe paper to create a trunk for my tree.
7. I used The Girls’ Paperie Tinsel & Twig sticker sheet to spell “tis the season” on my tree.
8. I stitched the letters down and then stitched around my tag.

that’s it!! super quick and simple and a nice way to add a personal touch to your presents.

Holiday Project – Handmade Tags – Watersoluble Crayons

A few months ago, I made some handmade tags for Julie’s handmade for the holidays series. There were six tags and one set of downloads. I will post all of them one at a time during this week.

For all my tags I used manila tags I bought at Office Depot. You can always cut your own tag from cardstock and punch a hole as well.

Here are the steps to this simple tag:
1. For this tag, I wanted to play with water-soluble crayons and sticky-back canvas. I stuck the canvas to my tag and then cut it out.
2. I colored the canvas using three different shades of green and then mixed them with water.
3. I then layered some trim to create a tree.
4. I separated one of my crepe paper embellishments to put the topper on the tree.
5. I cut the circle of the crepe paper down some to be in correct proportion with my tree. I used the cut piece to create the stump of my tree.
6. I added a star sticker on top of my tree topper.
7. I added the word stickers and stitched them down.

Supplies Used: The Girls’ Paperie Tinsel and Twig sticker market, trims, and crepe paper embellishments, Caran D’ache water soluble crayons, and sticky-back canvas. The little star sticker is an old one from Making Memories.

And here’s a movie where I demonstrate how I made the tag:

This was originally posted at Julie Fei-Fan Balzer‘s blog as part of handmade for the holidays series.

Holiday Project – Handmade Tags – Embossed Snowflakes

A few months ago, I made some handmade tags for Julie’s handmade for the holidays series. There were six tags and one set of downloads. I will post all of them one at a time during this week.

For all my tags I used manila tags I bought at Office Depot. You can always cut your own tag from cardstock and punch a hole as well.

Here are the steps to this simple tag:
1. For this tag, I wanted to experiment with embossing. I stamped some snowflakes into my background with embossing ink.
2. I embossed using sparkly clear embossing powder.
3. I then inked the tag using blues and greens. The embossed sections resisted the ink.
4. I added the big snowflake and changed the button with a bigger, more ornamental one.
5. I glued on ribbon on the bottom and added a sticker with Season

Supplies used: The Girls’ Paperie Tinsel and Twig vintage buttons, sticker market, trims, and flower market crepe paper. Broken China and Shabby Shutters distress ink.

And here’s a movie where I demonstrate how I made the tag:

This was originally posted at Julie Fei-Fan Balzer‘s blog as part of handmade for the holidays series.

The Chicken and the Hulk

I know we’re smack in the middle of Christmastime but I have this Halloween layout I made because I knew that if I didn’t make it, I would never make it since I am not a fan of Halloween at ALL.

Journaling Reads:
Despite the fact that I am not a fan of Halloween I do like seeing you guys dressed up and specifically seeing Nathaniel wear David’s old costumes. Seeing two different chickens makes me so happy and it makes the rest of this holiday worthwhile for me.

All products are from The Girls’ Paperie Toil and Trouble (except for the green button which is from Tinsel and Twig)

Details:

Holiday Project – Tag Advent Calendar

One of the holiday traditions both my son and I look forward to each year is the advent calendar. He loves having something to open every day in December and I love watching his anticipation each day.

I’ll admit that for the last two years, we’ve been using calendars that are simple and have a piece of chocolate behind each door. This year, I wanted to do something different. Something more personal. I know he likes the little treat every day and I am happy to still give that to him but I wanted to make sure he doesn’t grow up thinking that opening an advent calendar just means getting chocolate.

So I decided to make a tag with pockets for each day. In each pocket, I put a card with a little message. Every night, he will take out the appropriate card and do whatever’s on it.

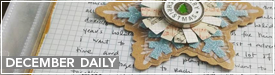
Here’s what one tag looks like:

My tags are constructed very simply. Since there are 25 days, I decided to pick 5 different color schemes for the tags and pockets and I repeated each five times. Here are the basic steps I followed for each tag:

1. Take manila tag, adhere to background paper, cut.
2. Ink edges with dark brown chalk ink.
3. Cut pocket, ink its edges using the same ink.
4. Stitch around the tag, stitching the pocket in place in the process.
5. Embellish.

That’s it. Simple as pie.

Here’s how they look altogether.

If you look carefully, you can see that the color combinations repeat but because I embellished each slightly differently, they don’t look exactly the same.

Here is a closer look at each tag:


All of the papers and embellishments are from The Girls’ Paperie. Almost everything is from the Tinsel and Twig line but there are a few items from the Toil and Trouble line.

For the insides, I made a 2×2 square which says “celebrate the season” in tiny font. (You can download it here.)

I then printed them out and punched out the squares. I stapled ribbon to the back of each square.

Finally, I wrote each day’s item on the tag.

Some of the items are purely for him (like the one in the photo) and others are family-related like “give your brother a hug.” And yet others are more community-wide. Like helping a friend at school.

Here’s what the tags look like with the papers in them.

I’ll admit that this project was a bit time consuming, but mostly because I spent a lot of time picking the simple embellishments on each tag. I love the fact that I can keep the same system year after year and even use the same squares. Or I can change them around as my kids grow up. I can even put two squares in one pocket so each of my kids can draw one.

Flexible, simple, pretty.

And here is the list of all the items on the tags:

S=self, F=family, C=community

1. You get a new book today (S)
2. We make paper snowflakes and hang them around the house (F)
3. Donate a book to someone (C)
4. Make a card for your teacher (C)
5. We play cards or any other game you want today. (S)
6. Give a present to someone at school today (C)
7. Pick one toy to donate (C)
8. Read your brother a book. (F)
9. You get to have some hot cocoa today. (S)
10. You get to stay up for one extra hour tonight (S)
11. Family movie night! (F)
12. Create a piece of art for a sick kid at the hospital. (C)
13. Leave a present on someone’s doorstep. (C)
14. We all go for a walk in the neighborhood and look at the lights. (F)
15. Make a card for one of our neighbors. (C)
16. Pick a book for mommy to read to you. (S)
17. Help mommy wrap presents. (F)
18. Let’s have a picnic under the Christmas tree! (F)
19. You spend one hour however you like. We all do what you want. (F)
20. Make a Christmas surprise book for your daddy and read it to him. (F)
21. Family game night tonight. (F)
22. You get 30 mins extra wii time today. (S)
23. Bake cookies and deliver to local police station and fire station. (C)
24. Open one Christmas present (S)
25. WE love you. Open all your presents!! (Christmas Day.)

This was originally posted at writeclickscrapbook.com for the holiday season.

Our First Batch of Cookies with Icing

A new month means a new write.click.scrapbook gallery. This month’s challenge is Holiday Food & Drink . You can see the full gallery here!

Journaling Reads:
I generally have a long list of things to try each December. Since you enjoyed the baking so much in 2008, I thought it would be fun for us to create our own cookies and decorate them with all sorts of fun icing. We brought some cutters from Target and made the cookie dough and waited overnight. As I had predicted, you loved every step of the way and spent hours decorating every cookie differently. Look at how pretty they look! And they tasted absolutely delicious, too. I predict more cooking in our future. December 2009.

Details:

A Growing Shoe Obsession in Progress

Journaling Reads:
Even though you haven’t owned any pairs so far (or maybe that’s why) you are obsessed with putting on shoes. You will put on any that you see and try to walk around. Your favorites are of course David’s shoes cause they can be put on easily and do not weigh so much so you can walk around. I just wish you didn’t want to wear them inside the house so much. Though you do look so cute. I love you.

Details:

You Can Find Delight and Joy and Happiness in Anything

Journaling Reads:
One of the greatest joys of having a little boy around is that he can find laughter and joy in the smallest things. You found that when you stepped on these sheets your feet stuck a little and made a funny noise. IT was so cool to you that you kept doing it again and again and laughing and giggling each time. Within minutes David and I were watching you and giggling along. You have made our life so much better and filled it with laughter by just being you. Thank you my son.

Details: