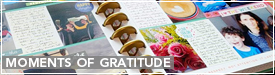
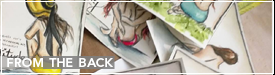
I know it’s not the end of the day yet but I knew what I wanted to do today so I just sat and made these pages that capture where my kids are at right now. Just a few things.
you are able to nod yes and no
you scream too often to express what you want
you give David many hugs each day
you are becoming a pickier eater
you are obsessed with having the TV on
you understand so much but say only a few words
you love playing and you are a happy happy boy
I am so thankful you are in our lives. We love you.
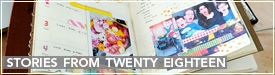
you are reading like a champ
you can write so well
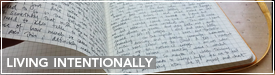
you keep a daily gratitude journal
you still love to color
you are a super-picky eater
you are so loving and kind to everyone
you make all of us so very very proud
I am so thankful you are in our lives. We love you.
A few months ago, I made some handmade tags for Julie’s handmade for the holidays series. There were six tags and one set of downloads. I will post all of them one at a time during this week.
For all my tags I used manila tags I bought at Office Depot. You can always cut your own tag from cardstock and punch a hole as well.
Here are the steps to this simple tag:
1. For this tag, I wanted to experiment with embossing. I stamped some snowflakes into my background with embossing ink.
2. I embossed using sparkly clear embossing powder.
3. I then inked the tag using blues and greens. The embossed sections resisted the ink.
4. I added the big snowflake and changed the button with a bigger, more ornamental one.
5. I glued on ribbon on the bottom and added a sticker with Season
Supplies used: The Girls’ Paperie Tinsel and Twig vintage buttons, sticker market, trims, and flower market crepe paper. Broken China and Shabby Shutters distress ink.
And here’s a movie where I demonstrate how I made the tag:
This was originally posted at Julie Fei-Fan Balzer‘s blog as part of handmade for the holidays series.
I know we’re smack in the middle of Christmastime but I have this Halloween layout I made because I knew that if I didn’t make it, I would never make it since I am not a fan of Halloween at ALL.
Journaling Reads:
Despite the fact that I am not a fan of Halloween I do like seeing you guys dressed up and specifically seeing Nathaniel wear David’s old costumes. Seeing two different chickens makes me so happy and it makes the rest of this holiday worthwhile for me.
All products are from The Girls’ Paperie Toil and Trouble (except for the green button which is from Tinsel and Twig)
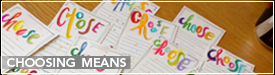
A few months ago, I made some handmade tags for Julie’s handmade for the holidays series. There were six tags and one set of downloads. I will post all of them one at a time during this week.
For all my tags I used manila tags I bought at Office Depot. You can always cut your own tag from cardstock and punch a hole as well.
Here are the steps to this simple tag:
1. I wanted to stamp on a transparency because I love the unique look it creates. When you do this, you need to make sure you use the rough side of the transparency.
2. I used a big script stamp I had and stamped using Statz-on ink.
3. Then I grabbed three different colors of felt. Two shades of green and one brown. I cut two triangles and one stump. I gently glued the pieces to the transparency so it stayed in place.
4. I then stitched around my tree.
5. I glued on some round beads for ornaments and a star sticker on top.
6. I covered my star with some distress stickles.
7. Finally, I added Merry Christmas with tiny alphabets and stitched them in place.
Supplies Used: Red Statz-On Ink, The Girls’ Paperie Tinsel and Twig Sticker Market, Antique Linen Distress Stickles, beads, felt, script stamp, transparency.
This was originally posted at Julie Fei-Fan Balzer‘s blog as part of handmade for the holidays series.
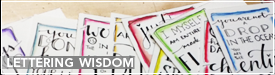
A few months ago, I made some handmade tags for Julie’s handmade for the holidays series. There were six tags and one set of downloads. I will post all of them one at a time during this week.
For all my tags I used manila tags I bought at Office Depot. You can always cut your own tag from cardstock and punch a hole as well.
Here are the steps to this simple tag:
1. Using two different shades of green distress ink, I colored the background of my tag.
2. I stamped two snowflakes to light blue paper.
3. I picked two facets and glued them on top of the snowflakes, using glossy accents, which dry completely clear.
4. I dabbed a small amount of blue and green alcohol ink on the facets to give them a blueish glow.
5. I put some baker’s twine through the holes of the facets and glued the whole thing down on my tag so they looked like dangling ornaments.
6. On the bottom of my tag, I glued a blue ribbon and put a sticker with red type on it.
7. I spelled the word “blessings” with small letter stickers on top of that.
8. Finally, I stitched all around the tag and on top of my tiny letters just to make sure they don’t fall off in the mail. I also like the texture stitching adds to my projects.
Supplies Used: Peeled Paint and Shabby Shutters Distress Inks, Tim Holtz Idea-ology Facets, Tim Holtz Shabby Vintage Paper, The Girls’ Paperie Tinsel and Twig stamps, The Girls’ Paperie Tinsel and Twig Sticker Market, Stream and Meadow alcohol inks.
And here’s a movie where I demonstrate how I made the tag:
This was originally posted at Julie Fei-Fan Balzer‘s blog as part of handmade for the holidays series.
I have three pages for today again. I love this pajama page so I didn’t alter it much. Just added the word-stickers.
On the back, I put the photo of me with my three boys and added the title Gilroy Gardens on top of the photo and a few more word stickers.
Second page starts with this photo of David I love.
Journaling Reads:
David, it’s likely you won’t remember tonight in a few months. But thanks to you, I will remember tonight forever. The way you screamed “awesome, awesome, awesome!!” as the train drove through tunnels tonight will remain etched in my heart for the rest of your life.
I must admit that we do a lot of these holiday events because I love them. I’ve learned a while ago that it’s best to do them for myself and if you guys like it, too, all the better. This is the only way I am always happy we went. But those times when you enjoy it just as much as I do, if not more, are the times I cherish more than anything else.
And when I look back on these days, I will not remember how tired I was or how many times you asked “how many more minutes till we’re home.” I will remember the joyful way you shouted awesome and the excitement that overcame you as you ran from one ride to another, trying to decide which one to go on first. Thank you, my son, for being my best present.
The back of that page is a photo of Nathaniel.
The third page is just a collage of all the other photos I love from the day.
More on the back.
And that’s day eleven.
I must say even though it’s simple, I love love love my December Daily already.
I loved this photo from yesterday so I used it on the front of my page.
Here’s the back:
Journaling Reads:
I love everything about the holiday season. I love the smells, the music, the joy, the gratitude, the presents, cuddling up, the crafts, advent calendars, trees, I could go on and on.
But what I love more than anything is the lights. I love that they are everywhere and that they add so much cheer to our life. Which is why I love Vasona Park. I still remember the first year we went there and saw all the lights. I was so awed. I loved looking at the Santa playing basketball, the penguins sliding off the igloo, Rudolph and Santa’s sleigh. Dinosaurs. Volcanos. And the pirate ship. The elusive ship that I cannot photograph for the life of me.
This year, they also gave 3-d glasses that created prisims everyhwere and made the whole sight even more magical. Seeing all this from the warm car while listening to Christmas music on the radio might be one of my favorite parts of the season. I love love love Vasona Park.
David loved looking at everything tonight, too. Even Nathaniel said “wow” at some point (though he might have just been making the noise randomly.) I know many might think it’s silly but these lights make me happy. They speak to the child still living inside me. And they make her jump with joy.
This second page has the aforementioned 3-d glasses in it.
I knew today would be magical because I knew it was the day of our Polar Express trip. But even I couldn’t imagine how wonderful it turned out to be. On the cover, I put the actual tickets and some lettering.
Here’s a closeup
For the back, I put a photo I took up there and added some accents. Simple.
Then I added two 5×7 pages with photos on both sides. I love this photo of Jake and David and I wrote some of my thoughts from the day on it.
The journaling reads:
Today we got to ride the Polar Express train to North Pole. Today we drove all the way to Sacramento just to get on the train. Both of you wore Christmas PJs. We ate lunch at a little cafe and David gave Daddy lots of hugs and Nathaniel made cute faces.
Today, a magician made David laugh. Nathaniel ran around the train station screaming with joy. We waited in line for the Katy car and got on and looked out the window with wonder and joy. We listened to Christmas music and heard the story of Polar Express.
Today the conductor signed our copy of the book. They gave us cookies and hot chocolate. We waved at Santa and his elves. We got our fist Christmas present from Santa. We waved our jingle bells and listened to their chime.
Today we laughed and laughed and laughed. We hugged. We shed tears of joy. We hugged some more. Today we were deeply grateful for our life. For being together. For the magic of Christmas. And the magic of little kids and their joy.
Today we made a collection of new memories. They will live etched in our hearts for a long time.
Today was a most magical day.
On the back, I put this photo of both kids laughing. I love these joyful blurry shots.
The second 5×7 has a photo of Nathaniel looking at the bell.
and on the back, I collaged a few more photos from the day.
and here’s the little boy very excited and curious when I take photos of these pages:
For the front, I just wrote a little title and left it at that. I liked the way it looked.
For the back, I wrote about the two rings I bought at the beginning of the season. I love love love these rings. I bought them right here in case anyone else wants some.
The journaling reads:
My favorite purchases this holiday season are these stacking rings. Jake & Karen and David & Nathaniel. I originally sized them to fit my right hand’s thumb and index finger but for now I’m wearing them both on my left index finger. I look at them several times a day and touch the letters often. I love my family more than anything else in the world and these little rings allow me to carry them with me at all times.