I made this tag as part of a little something at A Million Memories.
I wanted to make a quick little tag that I could use on my presents this year. This tag was super-quick to make:
1. I took a plain manila tag from an office supply store.
2. I inked the background using several shades of green distress ink.
3. Using my edge punch, I punched out several strips from my The Girls’ Paperie Tinsel & Twig Snowfall paper in different sizes.
4. I layered the paper so that it looked like a tree and glued it all down.
5. I took the top of one of my The Girls’ Paperie Tinsel & Twig crape paper snowflakes and cut down the crepe paper a bit to make the top of my tree.
6. I used the rest of the crepe paper to create a trunk for my tree.
7. I used The Girls’ Paperie Tinsel & Twig sticker sheet to spell “tis the season” on my tree.
8. I stitched the letters down and then stitched around my tag.
that’s it!! super quick and simple and a nice way to add a personal touch to your presents.
For the cover, I put some of the packaging from the fitbit with a photo and the packaging for my new WW points calculator. The journaling is under the tag that says “for life.”
On the back, I put photos of both kids on their computers and the journaling is on the tag that pulls out. The one that says memories.
simple simple. it’s the only way I’m able to do this album.
I tend to think that gift cards feel too impersonal for Christmas. But, for some people, a gift card is exactly the right gift so, for those occasions, I try to make it more personal by putting the card in a handmade gift card holder. For this one, I just took a plain manila tag from an office supply store and covered it with this beautiful paper from the Holly Jolly line. I then used the other side of the paper to create a small pocked on the tag, which I stitched on. I embellished my tag with chipboard pieces from Holly Jolly and even added a little baker’s twine which is easy to move out of the way so I can put the card in there.
Here it is with the card inside:
and here it is with the card sticking out:
If you want to make it even more elegant, you can put it in a brown box with some tissue paper. A big ribbon and you have a beautiful, hand-made gift.
This was originally posted at My Mind’s Eye’s blog.
I loved this photo of Nathaniel so much. I know it’s sad but it has so much emotion, especially in the way his hands are over his mouth.
the journaling is about how I hate to see him sad but I also don’t want him to throw things at David. And how much I love him of course.
The back is a shot I took at Target yesterday while we were shopping. I’ve been trying to eat healthier so I wanted to make sure to commemorate that. Fresher and less processed for me.
This was done as a guest design spot for Mission to Create, please make sure to visit the blog so you can see all the amazing creations.
Journaling Reads:
I often find myself wishing for the next steps in life. For you to walk and then talk and then be potty trained and on and on. But then I look at David and remember when he was little like you. Time passes too quickly. I need to slow down and enjoy you right now.
I have this window in front of my desk that always stays closed. For the holidays, I thought it would be fun to make a little garland so I can enjoy the little sunlight that comes in. I hung a small Martha Stewart garland and then punched hearts, snowflakes, doilies and butterflies out of my favorite green and blue My Mind’s Eye papers and I stitched to my heart’s content and just loosely hung them on each other so it looks like a web of snowflakes.
Since it’s right in front of the window, it’s hard to get a good shot, but I really do love it.
I even made a little movie for you:
This was originally posted at My Mind’s Eye’s blog.
Yesterday was a sweet day at home together but the page I had was too small so I switched bases of 18 and 17 and put my new little tree on the front page.
The back has some photos from our ordinary day:
Journaling reads:
today was a perfectly ordinary day. the kind that makes you thankful for the small things in life. for tiny moments of laughter. for cuddling. lego time. ornaments made at school. even for the annoyed faces the baby makes when he’s told not to touch. these little ordinary moments are what life is made out of and they are the things we don’t normally pay attention to but they are so special on their ow. when i look at these photos, i am so grateful for everything we have together.
A few months ago, I made some handmade tags for Julie’s handmade for the holidays series. There were six tags and one set of downloads. I will post all of them one at a time during this week.
For all my tags I used manila tags I bought at Office Depot. You can always cut your own tag from cardstock and punch a hole as well.
Here are the steps to this simple tag:
1. For this tag, I wanted to play with water-soluble crayons and sticky-back canvas. I stuck the canvas to my tag and then cut it out.
2. I colored the canvas using three different shades of green and then mixed them with water.
3. I then layered some trim to create a tree.
4. I separated one of my crepe paper embellishments to put the topper on the tree.
5. I cut the circle of the crepe paper down some to be in correct proportion with my tree. I used the cut piece to create the stump of my tree.
6. I added a star sticker on top of my tree topper.
7. I added the word stickers and stitched them down.
Supplies Used: The Girls’ Paperie Tinsel and Twig sticker market, trims, and crepe paper embellishments, Caran D’ache water soluble crayons, and sticky-back canvas. The little star sticker is an old one from Making Memories.
And here’s a movie where I demonstrate how I made the tag:
This was originally posted at Julie Fei-Fan Balzer‘s blog as part of handmade for the holidays series.
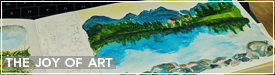
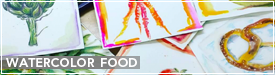
Something simple and crafty today. I used a canvas piece by Maya Road. Used watercolor crayons to color it and then added some Maya Road flowers and some words.
another look:
The back also has some Maya Road flowers and some more words.
another look:
i like the mix of crafty pages with stories. it makes me happy (though it also makes my album fatter.)
A few months ago, I made some handmade tags for Julie’s handmade for the holidays series. There were six tags and one set of downloads. I will post all of them one at a time during this week.
For all my tags I used manila tags I bought at Office Depot. You can always cut your own tag from cardstock and punch a hole as well.
Here are the steps to this simple tag:
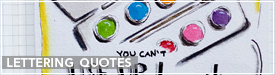
1. For this tag, I wanted to play with copic markers. I stamped three different ornament stamps on copic-friendly paper.
2. I colored the ornaments using blues, pinks, purples, and red.
3. I cut them out and attached baker’s twine to each.
4. I covered my tag with print paper.
5. I inked the edges of the tag to define the edges better.
6. I put the ornaments on the tag with dimensional tape so they stood out a little.
7. I then added the tiny alphabets and stitched through them to ensure they wouldn’t fall off.
8. Ta-da! Another tag done.
Supplies Used: My Mind’s Eye Holly Jolly stamps, My Mind’s Eye I Believe stamps, The Girls’ Paperie Tinsel and Twig sticker market, Making Memories Ledger Slice Paper Pack, Dusty Concord Distress ink, baker’s twine and copic markers.
And here’s a movie where I demonstrate how I made the tag:
This was originally posted at Julie Fei-Fan Balzer‘s blog as part of handmade for the holidays series.
A few months ago, I made some handmade tags for Julie’s handmade for the holidays series. There were six tags and one set of downloads. I will post all of them one at a time during this week.
For all my tags I used manila tags I bought at Office Depot. You can always cut your own tag from cardstock and punch a hole as well.
Here are the steps to this simple tag:
1. For this tag, I wanted to play with fabric. I covered the background with polka-dot red fabric that I love. I glued it down and then stitched around the edges of the tag.
2. I then added the felt reindeer with the baker’s twine around his neck.
3. I put a bling on his eye and one on his nose.
4. I added the word stickers and stitched through them to make sure they stayed in place.
5. I added two border stickers on top and bottom and put the sentiment sticker in the middle of the two.
6. I stitched through the whole thing a few times to make sure the sticker would stay in place.
Supplies used: The Girls’ Paperie Tinsel and Twig sticker market, fabric, bling, felt reindeer, and baker’s twine.
This was originally posted at Julie Fei-Fan Balzer‘s blog as part of handmade for the holidays series.
I made this layout a long while ago but it looks like I never posted it.
Journaling Reads:
Dead David, you don’t know now but you’ve been so very lucky for the last three years. You’ve had the very best teachers. You started with teacher Lana and Mary (whom you loved so very much) and then the next year you had even more luck with teachers Melissa, Cody, and Kathleen. They cared for you so very much. And this year you finished your preschool with teacher Joel who’s known you for so long and loved you so much. As you start kindergarten this year, my biggest wish for you is that you get another amazing teacher. It makes all the difference. June 2010.